Introduction
In 2024, Shopify remains one of the leading e-commerce platforms, enabling entrepreneurs and businesses to set up online stores with ease. With its user-friendly interface, robust features, and extensive resources, Shopify empowers users to turn their business ideas into reality. As the digital landscape continues to evolve, understanding how to sell on Shopify in 2024 (FOR BEGINNERS) is crucial for anyone looking to enter the e-commerce space.
Knowing how to effectively sell on Shopify not only enhances your ability to attract customers but also maximizes your chances of success in a competitive market. This platform offers countless tools and strategies that can help you stand out, reach a wider audience, and ultimately drive sales. By mastering the essentials of selling on Shopify, you can build a thriving online business that meets the needs of today’s consumers. Let’s dive into the key steps you need to take to succeed on this powerful platform.
Understanding Shopify Basics
What is Shopify?
Shopify is an easy-to-use online platform that helps you create your own online store. It started in 2006 and has become one of the most popular choices for selling products online. Shopify makes it simple for anyone, whether you’re a beginner or experienced, to set up and manage a store without needing technical skills.
Key Features and Benefits for Beginners
- User-Friendly Interface: Shopify has a simple drag-and-drop system, so you can design your store without any coding.
- Customizable Themes: You can choose from many beautiful templates to make your store look great and reflect your brand. Most themes work well on mobile devices too.
- Payment Options: Shopify allows you to accept various payment methods, like credit cards and PayPal, making it easy for customers to buy from you.
- App Store: There are many apps available that help you add extra features to your store, like email marketing or inventory management, without hassle.
- 24/7 Customer Support: If you have questions or run into problems, Shopify has support available anytime to help you out.
- SEO Tools: Shopify includes tools that help your store show up on search engines, which can bring in more visitors.
Overview of Different Shopify Plans
Shopify offers different pricing plans to suit your needs:
- Basic Shopify: This plan is great for beginners. It gives you everything you need to start your online store, including support and unlimited products.
- Shopify: This plan includes everything in the Basic plan, plus some extra features like advanced reporting to help you understand your sales better.
- Advanced Shopify: Designed for growing businesses, this plan has more features like detailed reports and lower fees on transactions.
- Shopify Plus: This is for large businesses that need custom solutions and dedicated support.
By understanding these basics of Shopify, you’ll be better prepared to start your online store and succeed in your e-commerce journey!
Setting Up Your Shopify Store
Step-by-Step Guide to Creating Your Shopify Account

- Visit Shopify: Go to the Shopify website.
- Start Free Trial: Click on “Start free trial.” You’ll need to enter your email address, create a password, and choose a store name.
- Answer Questions: Shopify will ask a few questions about your business. Answer them to help customize your experience.
- Set Up Your Account: Follow the prompts to complete your account setup. You’ll need to provide some basic information about yourself and your business.
- Access Your Dashboard: Once your account is created, you’ll be taken to your Shopify dashboard, where you can start building your store.
Choosing the Right Pricing Plan for Your Needs

- Explore Plans: Shopify offers several pricing plans. Take a moment to look at what each plan includes.
- Basic Shopify: This is ideal for new businesses. It has all the essential features you need to get started.
- Shopify Plan: If you want more advanced reporting and features, this plan is a good choice as you grow.
- Advanced Shopify: This plan is for established businesses that need detailed analytics and lower transaction fees.
- Decide on a Plan: Choose the plan that best fits your needs and budget. You can always upgrade later if necessary.
Selecting a Domain Name
- Think of a Name: Choose a domain name that reflects your business and is easy to remember. Try to keep it short and relevant to what you sell.
- Check Availability: Use the Shopify platform to see if your chosen domain name is available. If it’s taken, think of variations or different extensions (like .com, .net).
- Register Your Domain: If your desired name is available, you can purchase it directly through Shopify. This will link the domain to your store automatically.
- Connect Your Domain: If you buy a domain elsewhere, you can follow Shopify’s instructions to connect it to your store.
By following these simple steps, you’ll be well on your way to setting up your Shopify store!
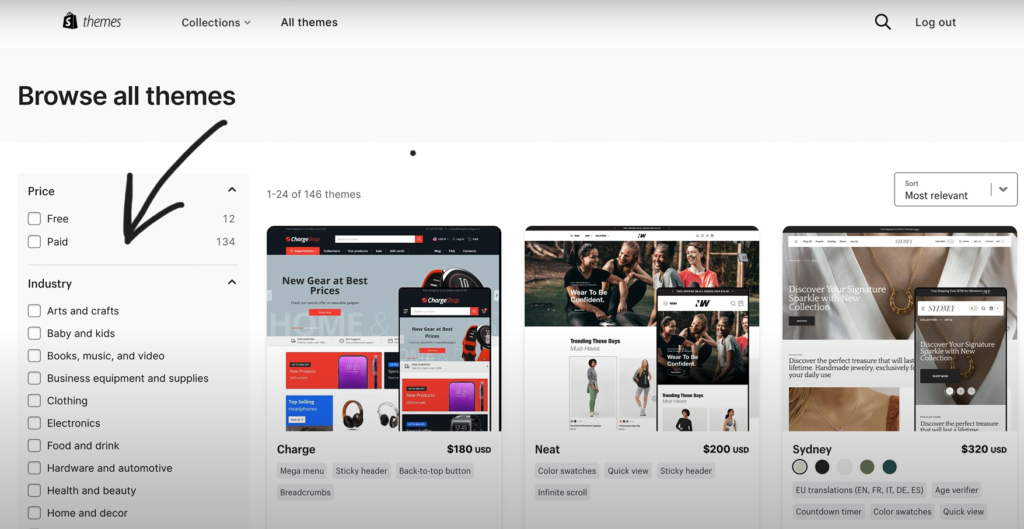
Choosing a Theme
Importance of a Good Theme
Selecting the right theme for your Shopify store is crucial because it sets the tone for your entire site. A good theme:
- Attracts Customers: An appealing design can draw visitors in and encourage them to explore your products.
- Builds Trust: A professional-looking store helps establish credibility, making customers feel safe to shop.
- Improves Navigation: A well-organized theme makes it easier for customers to find what they’re looking for, enhancing their shopping experience.
- Enhances Mobile Experience: Many shoppers use mobile devices. A responsive theme ensures your store looks great on any screen size.
Customizing Your Theme to Fit Your Brand
- Access the Theme Editor: Once you’ve chosen a theme, go to your Shopify dashboard and click on “Online Store” and then “Themes.”
- Edit Colors and Fonts: Use the theme editor to change colors, fonts, and layout to match your brand identity. Make sure your choices are consistent and appealing.
- Upload Your Logo: Add your logo to help customers recognize your brand. Place it in a prominent position, usually at the top of your homepage.
- Customize the Homepage: Design your homepage to highlight your best products, collections, or promotions. Use banners and featured images to catch attention.
- Add Essential Sections: Include sections like “About Us,” “Contact,” and customer testimonials to build trust and provide important information.
By choosing the right theme and customizing it to fit your brand, you can create an engaging and professional-looking online store that attracts customers and encourages sales.
Adding Products
How to Add Products to Your Store

- Access Your Dashboard: Log into your Shopify account and go to your dashboard.
- Navigate to Products: Click on the “Products” section in the left-hand menu.
- Add a Product: Click the “Add product” button. This will open a new page where you can enter product details.
- Fill in Product Information:
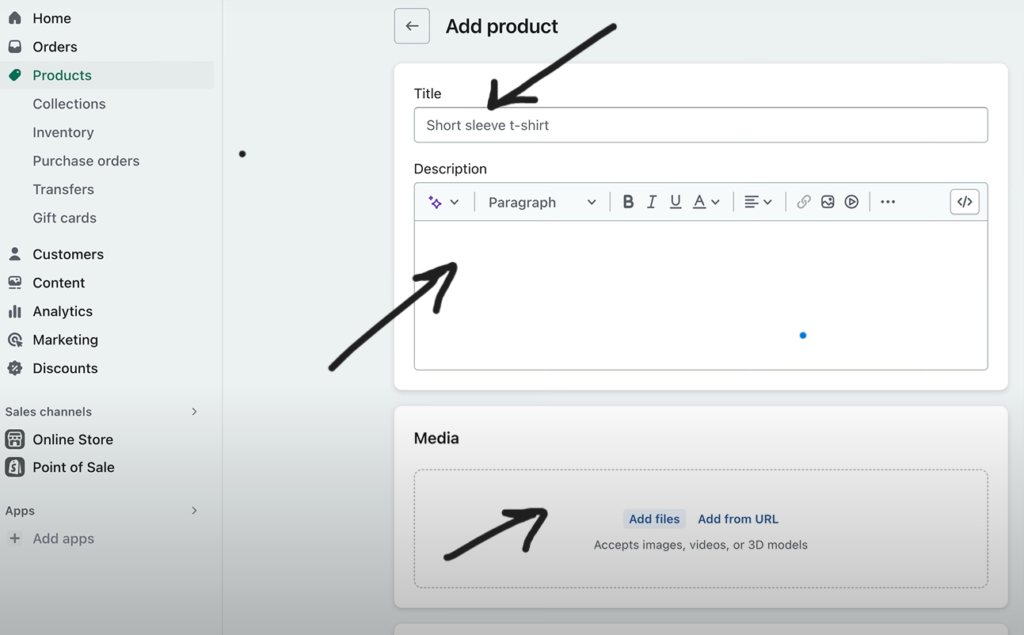
- Title: Give your product a clear and descriptive name.
- Description: Write a detailed description that highlights the features and benefits of the product.
- Price: Set the price for your product.
- Inventory: Enter how many items you have in stock.
- Shipping: Provide weight and dimensions if applicable.
- Upload Images: Add high-quality images of your product to showcase it effectively.
- Save the Product: Once you’ve filled in all the necessary information, click “Save” to add the product to your store.
Tips for Writing Effective Product Descriptions
- Be Clear and Concise: Use simple language to describe the product. Make sure customers understand what they’re buying.
- Highlight Benefits: Focus on what makes your product special. Explain how it solves a problem or meets a need.
- Use Keywords: Incorporate relevant keywords to help with search engine optimization (SEO). This can help more customers find your product.
- Add Bullet Points: Use bullet points for key features to make the information easy to scan.
- Create a Story: If applicable, tell a short story about the product to engage customers emotionally.
Importance of High-Quality Images
- First Impressions Matter: High-quality images attract customers and make your products look more appealing. They create a positive first impression.
- Showcase Details: Good images allow customers to see the product details clearly, helping them make informed buying decisions.
- Build Trust: Professional-looking images enhance your brand’s credibility. Customers are more likely to purchase from a store that appears polished and trustworthy.
- Increase Sales: Studies show that products with high-quality images often sell better than those with poor images.
By effectively adding products to your Shopify store with strong descriptions and quality images, you can enhance the shopping experience and boost your sales potential.
Setting Up Payment and Shipping
Overview of Payment Gateways Available in Shopify
Shopify supports various payment gateways, which are services that allow you to accept online payments. Some popular options include:
- Shopify Payments: This is Shopify’s own payment processing service. It’s easy to set up and allows customers to pay using credit cards directly on your store.
- PayPal: A widely used payment option that allows customers to pay using their PayPal accounts or credit cards linked to their accounts.
- Stripe: Another popular gateway that supports credit card payments and is known for its security.
- Others: Shopify also supports various other payment gateways, including Authorize.net, Square, and many more. You can choose the one that works best for your business.
Configuring Payment Settings
- Access Payment Settings: From your Shopify dashboard, go to “Settings” and then click on “Payments.”
- Choose a Payment Provider: Select the payment gateways you want to use. If you want to use Shopify Payments, click “Activate.”
- Enter Required Information: Follow the prompts to enter necessary details, like your business information and bank account for deposits.
- Test Your Payments: After setting up, it’s a good idea to test your payment process to ensure everything works smoothly.
- Save Your Settings: Don’t forget to save your changes!
Setting Shipping Rates and Options
- Access Shipping Settings: In your Shopify dashboard, go to “Settings” and then click on “Shipping and Delivery.”
- Set Up Shipping Zones: Define where you want to ship your products. You can create different shipping zones for domestic and international shipping.
- Choose Shipping Rates:
- Free Shipping: You can offer free shipping for certain products or orders over a certain amount.
- Flat Rate: Set a flat shipping fee for all orders or for specific regions.
- Calculated Rates: Use real-time shipping rates from carriers like USPS or UPS based on the weight and destination of the package.
- Save Your Shipping Settings: Make sure to save all your changes once you’ve set your shipping rates and options.
By setting up payment and shipping correctly, you’ll create a smooth checkout experience for your customers, helping you increase sales and improve satisfaction.
Creating Essential Pages
Importance of Pages Like About Us, Contact Us, and Privacy Policy
Creating essential pages on your Shopify store is vital for building trust and providing important information to your customers. Here’s why each page matters:
- About Us: This page helps customers understand your brand’s story, values, and mission. It creates a personal connection, making shoppers feel more comfortable buying from you.
- Contact Us: A dedicated contact page gives customers a way to reach you with questions or concerns. It shows that you care about customer service and are available to help.
- Privacy Policy: This page outlines how you collect, use, and protect customer information. Having a clear privacy policy builds trust and complies with legal requirements, assuring customers that their data is safe.
How to Create These Pages Using Shopify
- Access Your Shopify Dashboard: Log into your Shopify account and go to your dashboard.
- Navigate to Online Store: In the left-hand menu, click on “Online Store,” then select “Pages.”
- Add a New Page:
- Click the “Add page” button.
- For the title, enter the name of the page (e.g., “About Us”).
- Use the text editor to add your content. You can include text, images, and links.
- Set the Visibility: Choose whether you want the page to be visible to your customers right away or if you want to save it for later.
- Save the Page: Once you’ve added the content, click the “Save” button.
- Repeat for Other Pages: Repeat the process to create your Contact Us and Privacy Policy pages. For the Privacy Policy, you can find templates online or use Shopify’s built-in generator for a basic outline.
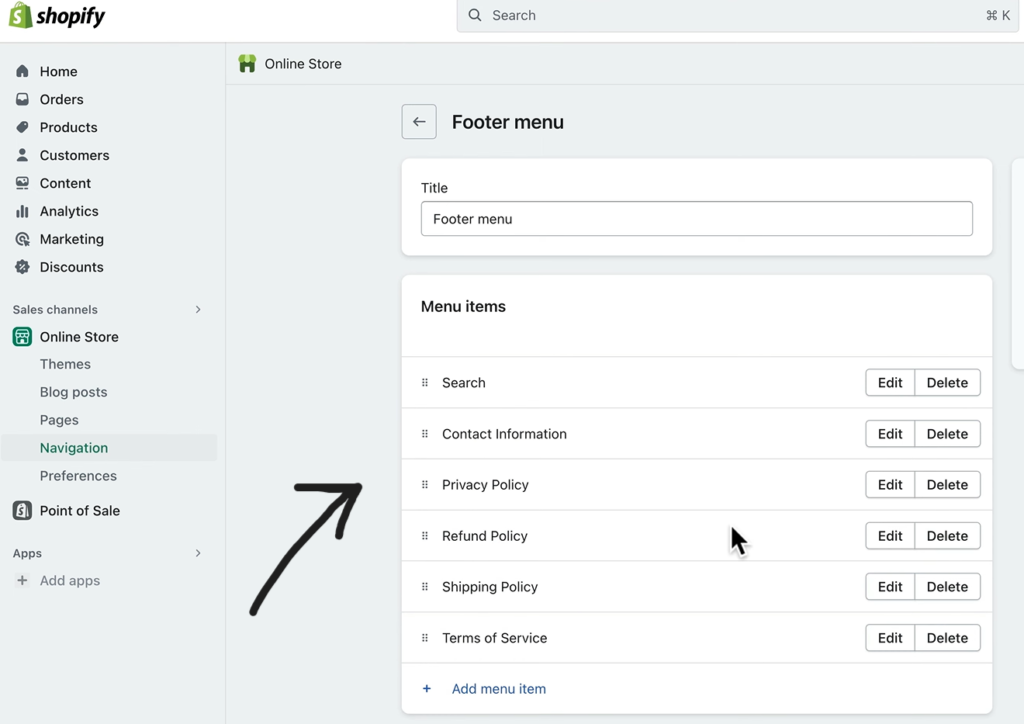
- Add Pages to Your Menu:
- To make your pages easy to find, go to “Online Store” and then “Navigation.”
- Choose the menu where you want to add the pages (like the main menu or footer menu).
- Click “Add menu item,” select the page you created, and name it appropriately. Save the changes.
By creating these essential pages, you enhance your store’s credibility and improve the shopping experience for your customers, making it easier for them to connect with your brand and understand your policies.
Marketing Your Store
Overview of Marketing Strategies for Beginners
Marketing your Shopify store effectively is essential for attracting customers and increasing sales. Here are some key strategies to consider:
- Search Engine Optimization (SEO): Optimize your website for search engines to improve visibility. Use relevant keywords in your product descriptions, titles, and blog posts to help potential customers find you.
- Content Marketing: Create valuable content that resonates with your target audience. This could include blog posts, videos, or guides related to your products or industry.
- Social Media Marketing: Utilize social media platforms to promote your products and engage with customers. Share updates, special offers, and user-generated content to build a community around your brand.
- Paid Advertising: Consider using paid ads on platforms like Google Ads or Facebook Ads to reach a larger audience quickly. Set a budget and target specific demographics to maximize your return on investment.
Utilizing Social Media Platforms
Social media is a powerful tool for promoting your store. Here’s how to use it effectively:
- Choose the Right Platforms: Focus on platforms where your target audience spends their time. Instagram and Facebook are great for visual products, while LinkedIn may be better for B2B.
- Create Engaging Content: Share high-quality images, videos, and stories about your products. Use polls, questions, and contests to engage your audience and encourage interaction.
- Consistency is Key: Post regularly to keep your audience engaged. Use a content calendar to plan your posts in advance.
- Leverage Influencers: Collaborate with influencers in your niche to reach new audiences. They can promote your products to their followers, boosting your visibility.
Importance of Email Marketing and Tools Like GetResponse
Email marketing remains one of the most effective ways to reach customers. Here’s why it’s important:

- Direct Communication: Email allows you to communicate directly with your customers, providing updates, promotions, and personalized content.
- Build Customer Loyalty: Regular newsletters and exclusive offers can help nurture relationships with your customers, encouraging repeat purchases.
- Automate Your Efforts: Tools like GetResponse make it easy to automate your email campaigns. You can set up welcome emails, follow-ups, and reminders, saving you time while engaging customers.
- Track Performance: Email marketing tools provide analytics to track open rates, click-through rates, and conversions. This data helps you refine your strategies for better results.
By implementing these marketing strategies and utilizing tools like GetResponse, you can effectively promote your Shopify store, attract new customers, and grow your business.
Utilizing Shopify Apps
Utilizing Shopify Apps can greatly enhance your online store by providing essential tools for various needs. The Shopify App Store offers options like Plug in SEO for improving search visibility, GetResponse for email marketing, and Oberlo for efficient dropshipping. By integrating these apps, you can streamline operations, boost marketing efforts, and create a better shopping experience for your customers, helping your store grow effectively.
Analyzing and Optimizing
To effectively track sales and traffic using Shopify Analytics, log into your dashboard and navigate to the “Analytics” section to view key metrics like total sales and sessions. Explore detailed reports on sales, traffic sources, and customer behavior, using date filters to compare performance over time. Focus on identifying best-selling products, analyzing where your visitors come from, and optimizing landing pages to reduce bounce rates. Ensure your store is mobile-friendly, test different layouts or descriptions for effectiveness, and gather customer feedback for continuous improvement. By leveraging these insights, you can enhance your store’s performance and drive more sales.
Resources for Further Learning
- Shopify Help Center: A comprehensive guide with articles and tutorials on using Shopify effectively.
- Shopify Academy: Offers free courses on e-commerce, marketing, and store management to enhance your skills.
- Shopify Blog: Features tips, success stories, and industry insights to keep you informed and inspired.
Community Support:
- Shopify Community Forum: Connect with other Shopify users to ask questions, share experiences, and get advice.
- Facebook Groups: Join groups focused on Shopify and e-commerce for peer support and networking opportunities.
These resources can help you continue learning and growing your Shopify store!
Conclusion
Starting your journey to sell on Shopify is an exciting opportunity to turn your business ideas into reality. With its user-friendly platform and powerful tools, you have everything you need to succeed. Don’t hesitate to dive in and begin building your store today! For further learning and resources, remember to visit [a2zpoint.in], where you’ll find guides and tips to help you navigate your Shopify experience and grow your online business. Happy selling!
Is Shopify beginner friendly?
Yes, Shopify is very beginner-friendly. It offers an intuitive interface, drag-and-drop design capabilities, and extensive resources to help new users set up their stores easily. With numerous templates and straightforward setup processes, beginners can navigate the platform without extensive technical knowledge.
How to sell on Shopify for beginners?
To sell on Shopify as a beginner:
- Sign Up: Create an account on Shopify.
- Choose a Theme: Select a professional template for your store.
- Add Products: Upload product images, descriptions, and prices.
- Set Up Payment Options: Configure payment gateways for transactions.
- Launch Your Store: Go live and promote your store through social media and marketing strategies.
How to set up a Shopify store for dropshipping?
To set up a Shopify store for dropshipping:
- Sign Up for Shopify: Create an account.
- Choose a Dropshipping App: Install apps like Oberlo or Spocket to find products.
- Import Products: Use the app to add products to your store.
- Set Pricing and Shipping: Configure your pricing strategy and shipping settings.
- Launch and Market: Go live and promote your store through various channels
How to create an e-commerce website in Shopify?
To create an e-commerce website in Shopify:
- Create an Account: Sign up for a Shopify plan.
- Select a Theme: Choose a visually appealing theme.
- Customize Your Store: Use the Shopify editor to add your brand elements.
- Add Products: Include product details, images, and prices.
- Set Up Payment and Shipping: Configure payment methods and shipping options.
- Launch Your Store: Make your store live and start selling.
How to create a Shopify store step by step?
- Sign Up for Shopify: Start your free trial or select a plan.
- Choose a Domain Name: Pick a unique domain for your store.
- Select a Theme: Browse and choose a theme that fits your brand.
- Add Products: Upload product details and images.
- Set Up Payment Methods: Choose how you’ll accept payments.
- Configure Shipping: Set shipping rates and regions.
- Launch Your Store: Go live and promote your business
Can I make a Shopify website myself?
Yes, you can make a Shopify website yourself. The platform is designed for users of all skill levels, providing easy-to-use tools and templates that allow you to create a professional online store without needing coding experience.
How to create a Shopify website 2024 e-commerce website tutorial free?
To create a Shopify website in 2024 for free:
- Sign Up for a Free Trial: Start with Shopify’s free trial.
- Follow Online Tutorials: Use resources like Shopify’s Help Center and YouTube for step-by-step guides.
- Join Communities: Engage with online forums and groups for tips and advice.
- Explore Free Themes: Select from free themes in the Shopify Theme Store.
How to build a Shopify website from scratch?
- Create an Account: Sign up for Shopify.
- Choose a Domain: Pick a domain that represents your brand.
- Select a Theme: Start with a blank theme or a free template.
- Customize Your Store: Use the editor to add your branding and style.
- Add Products: Upload product information and images.
- Configure Payment and Shipping: Set up how you'll accept payments and ship products.
- Launch: Go live and promote your store.
How do I sell on Shopify for beginners?
To sell on Shopify as a beginner, sign up for an account, choose a theme, add products, set payment methods, and launch your store. Utilize Shopify’s resources and community support to guide you along the way.
What is the easiest thing to sell on Shopify?
The easiest things to sell on Shopify include print-on-demand items, digital products (like e-books or courses), and dropshipping products, as they require less upfront investment and inventory management.
How to start a Shopify store for beginners?
- Sign Up for Shopify: Create an account.
- Choose a Theme: Select a suitable template.
- Add Products: Upload product details and images.
- Set Up Payments and Shipping: Configure payment gateways and shipping options.
- Launch Your Store: Go live and start promoting.
How to sell on Shopify in 2024 for beginners online?
To sell on Shopify in 2024 as a beginner, follow the steps to set up your store, optimize your listings for SEO, and promote your products through social media and online marketing strategies.
How to set up a Shopify store for dropshipping?
- Create a Shopify Account: Sign up for a Free plan.
- Choose a Dropshipping App: Install an app like Oberlo.
- Find Products: Use the app to select products to sell.
- Customize Your Store: Make your store visually appealing.
- Launch Your Store: Start selling and promote your business.
Selling products online from home for beginners?
To sell products online from home as a beginner, choose a niche, set up a Shopify store, and list your products. Use social media and online marketing to reach customers and drive sales.