1. Introduction to Shopify
Shopify is an easy-to-use e-commerce platform that helps beginners quickly create and manage online stores. With customizable templates and built-in tools for selling, payments, and inventory, it’s perfect for launching an online business. Start selling with Shopify in 2024 without needing technical skills.
2. Why Shopify in 2024
Shopify in 2024 brings new AI-powered product recommendations, faster checkouts, and better mobile optimization. These updates make it easier than ever to start and grow an online store. With advanced marketing tools and seamless integrations, Shopify remains a top choice for e-commerce success.
In this tutorial, you’ll discover how to create your Shopify store from scratch in just a few simple steps. From choosing the perfect theme and adding products to setting up payments and launching your store, we’ll guide you every step of the way. By the end, you’ll have a fully functional online store, ready to attract customers and drive sales. If you’re serious about starting an online business in 2024, this is your moment—let’s get started!
3. What is Shopify?
Shopify is the perfect platform for beginners, offering an incredibly user-friendly setup that requires no technical skills. With a wide selection of customizable themes, you can easily create a professional-looking online store that reflects your brand’s identity.
Beyond ease of use, Shopify is highly scalable, making it suitable for businesses of all sizes. It also supports multiple payment gateways, ensuring a smooth and secure checkout experience for your customers. With these advantages, a Shopify tutorial for beginners is the key to launching your e-commerce journey successfully!
4. How to Sign Up for Shopify
Step-by-Step Guide to Create a Shopify Account
Navigate to Shopify’s Official Website
To get started, visit Shopify.com. Once there, you’ll find an intuitive interface that guides you through the account creation process.
Sign Up for a 14-Day Free Trial
Click on the “Start Free Trial” button on the homepage to initiate the signup process. Shopify offers a 14-day free trial, allowing you to explore the platform’s features without any upfront cost. During this trial, you can set up your store and test out various tools to see how they can benefit your business.

Provide Required Details
As part of the sign-up process, you’ll need to enter essential details such as your email address, a unique store name that represents your brand, and a secure password. Make sure to choose a memorable store name, as this will be part of your Shopify domain.
Complete the Verification Process
After entering your information, Shopify may ask you to verify your email address. Check your inbox for a verification email and follow the instructions to confirm your account. Once verified, you’ll have full access to your new Shopify account and can start building your online store.
5. Navigating the Shopify Dashboard
Overview of the Shopify Dashboard
The Shopify dashboard is your central hub for managing your online store. Upon logging in, you’ll see the Home section, which provides an overview of your store’s performance, including recent sales, traffic, and important notifications. The Orders section allows you to manage and fulfill customer orders, while the Products tab enables you to add, edit, and organize your product listings efficiently. In the Customers section, you can view customer profiles, track their orders, and manage customer communication. Additionally, the Analytics tab provides valuable insights into your store’s performance, including sales trends, visitor behavior, and conversion rates, helping you make data-driven decisions for your business.
Customizing the Dashboard
To optimize your Shopify experience, consider customizing the dashboard to better suit your business needs. You can arrange the sections to prioritize the information most relevant to you, such as sales data or customer inquiries. Shopify also allows you to add various apps that can integrate directly into your dashboard, enhancing functionality and providing additional insights. Furthermore, exploring the settings menu will enable you to tailor notifications and preferences, ensuring that you stay updated on crucial aspects of your business while focusing on what matters most. By personalizing your dashboard, you can create a more efficient workflow that aligns with your specific e-commerce goals.
6. Choosing and Customizing a Shopify Theme
Choosing a Theme
How to Access the Shopify Theme Store
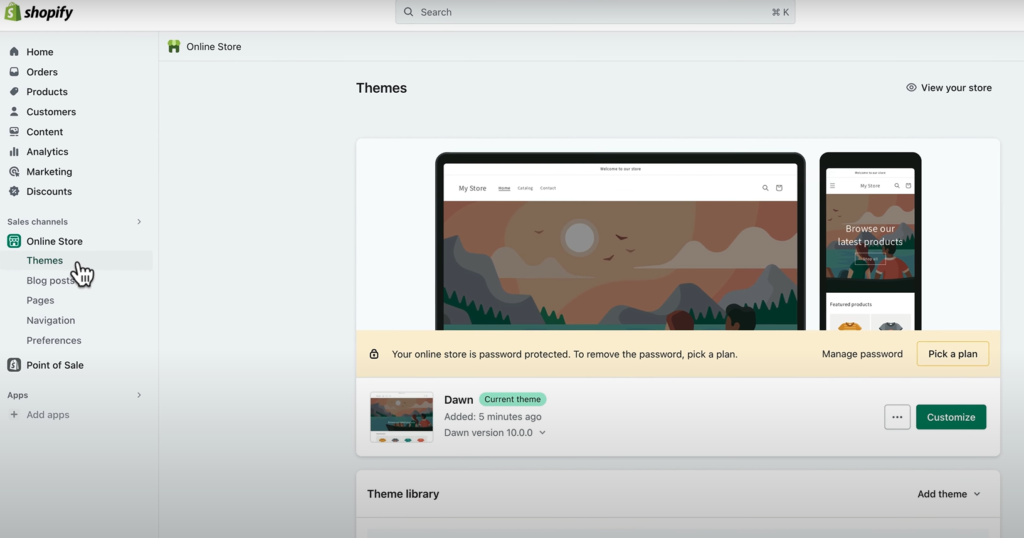
To access the Shopify theme store, log in to your Shopify account and navigate to the Online Store section in the left-hand menu. Click on Themes, and you’ll be directed to your current theme settings. Here, you’ll find an option labeled Visit Theme Store. Clicking this will take you to the Shopify theme store, where you can browse through a wide range of themes—both free and paid—to find the perfect design for your online store.
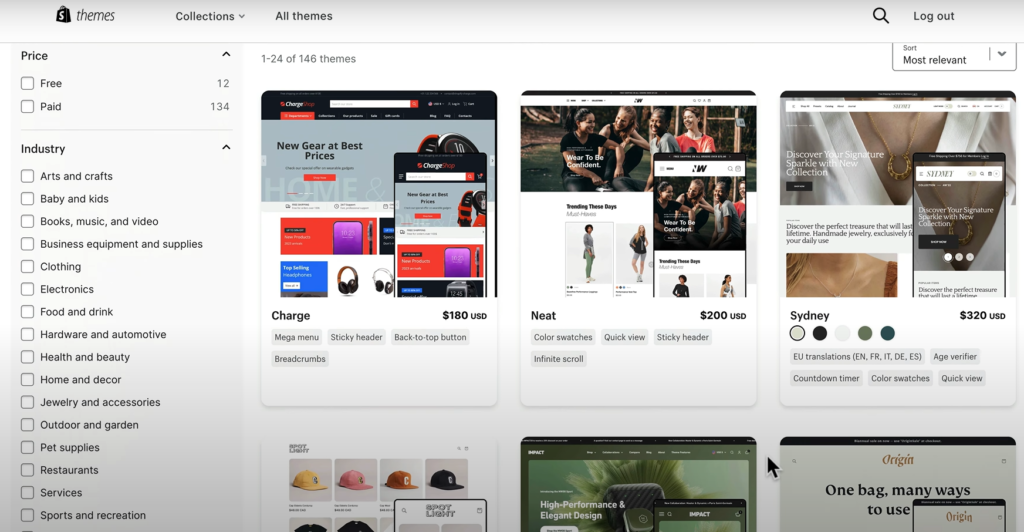
Free vs. Paid Themes – What to Consider
When deciding between free and paid themes for your Shopify store, there are several factors to consider. Free themes can be a great starting point, especially for beginners or those on a tight budget. They typically offer essential features and a professional look, allowing you to launch your store without significant investment. However, paid themes often provide advanced customization options, unique design elements, and dedicated customer support, which can enhance your store’s functionality and aesthetics.
Additionally, consider the specific needs of your business. Paid themes may include features like built-in SEO optimization, additional layout options, and regular updates, which can save your time and effort in the long run. Ultimately, weigh your budget against the features and support you’ll need to ensure your theme aligns with your business goals.
Factors to Consider: Design, Speed, Mobile Responsiveness
When choosing a theme for your Shopify store, three critical factors to consider are design, speed, and mobile responsiveness.
Design plays a vital role in attracting customers and conveying your brand’s identity. Look for a theme that reflects your brand’s aesthetic and offers customization options to create a unique storefront.
Speed is essential for a smooth shopping experience; a fast-loading theme can significantly reduce bounce rates and improve customer satisfaction. Choose a theme that is optimized for speed to keep your visitors engaged.
Lastly, mobile responsiveness is crucial, as a significant portion of online shopping occurs on mobile devices. Ensure the theme you select adapts seamlessly to various screen sizes, providing a consistent and user-friendly experience for all customers. By considering these factors, you can select a theme that enhances your store’s performance and appeal.
7.Customizing the Theme
Step-by-Step Instructions on How to Change the Look and Feel of a Theme
1. Access the Theme Customization
To begin customizing your Shopify theme, log in to your Shopify account and navigate to the Online Store section in the left-hand menu. Click on Themes, then locate your current theme and click the Customize button. This will open the theme editor where you can make various adjustments.
2. Edit the Colors
In the theme editor, look for the Colors section. Here, you can easily change the color scheme of different elements, such as the background, text, buttons, and links. Click on the color box next to each element to select a new color from the palette or enter a hex code for a specific shade that aligns with your brand.
3. Change Fonts
To modify the fonts used in your store, navigate to the Typography or Fonts section within the theme editor. Here, you can choose different font styles and sizes for headings, body text, and buttons. Make sure to preview your changes in real time to see how they enhance your overall design.
4. Adjust the Layout
To change the layout of your online store, explore the Sections or Layout options in the theme editor. You can rearrange, add, or remove sections like banners, featured products, and testimonials. Simply drag and drop sections to reposition them as desired, creating an engaging layout for your visitors.
5. Save Your Changes
After making all your adjustments, click the Save button at the top right corner of the theme editor to apply your changes. Your new look will be live on your store, ready to impress customers.
8.Adding Products to Your Store
How to Add Products
Step-by-Step Guide on Adding Products Manually
Adding products manually to your Shopify store is a straightforward process that allows you to showcase your offerings effectively. Here’s how to do it:
Access the Products Section
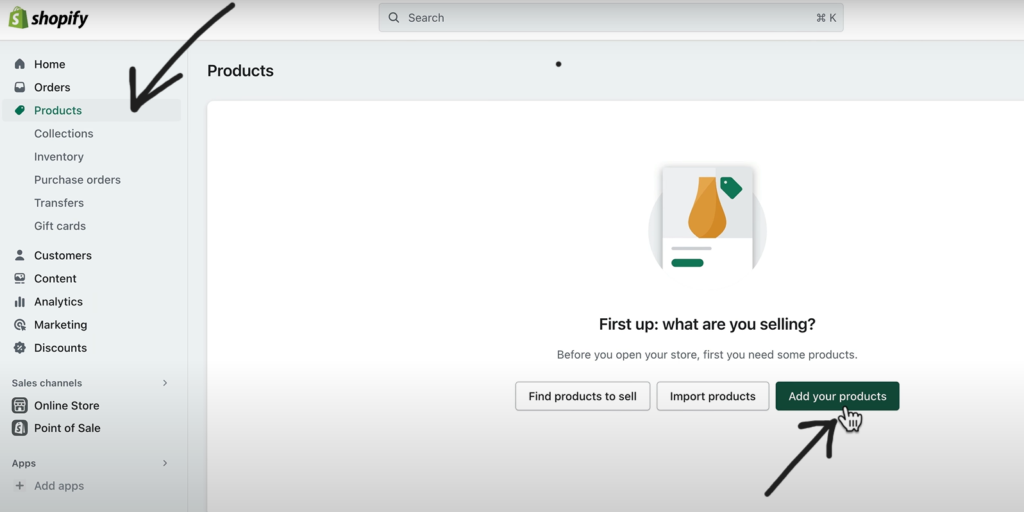
Begin by logging into your Shopify account and navigating to the Products section in the left-hand menu. Here, you’ll see an overview of your existing products and an option to add new ones.
Click on “Add Product”
On the Products page, find and click the Add Product button located at the top right corner. This action will take you to the product details page, where you can input all necessary information.
Enter Product Details
Fill in the essential product details, including the product name, description, and price. Be sure to write a compelling product description that highlights key features and benefits. Additionally, you can add a SKU (Stock Keeping Unit) for inventory tracking.
Upload Product Images
Scroll down to the Media section to upload images of your product. Click on Add Media and choose images from your device. Ensure the images are high quality and showcase the product from multiple angles to attract customers.
Set Inventory and Shipping Options
In the Inventory section, specify the quantity available for sale. If applicable, enable the Track quantity option to keep tabs on stock levels. Navigate to the Shipping section to enter product weight and select whether it requires shipping.
Organize Your Product
Use the Product Type, Vendor, and Collections fields to categorize your product. This helps customers navigate your store more easily. Additionally, you can add tags to improve searchability.
Configure SEO Settings
Scroll to the bottom of the product page and find the Search engine listing preview section. Click on Edit website SEO to customize the page title, meta description, and URL handle. Optimizing these elements helps improve your product’s visibility in search engines.
Save Your Product
Once you’ve filled in all the necessary information, click the Save button at the top right corner of the page. Your product will now be added to your Shopify store and available for customers to view.
How to Upload Product Images, Descriptions, and Pricing
Uploading Product Images
To upload product images, navigate to the Media section on the product page. Click on Add Media, then select the images from your device. It’s important to choose high-quality images that clearly display your product from various angles, as visuals play a key role in attracting potential customers.
Adding Product Descriptions
In the product details section, you’ll find a space to input the Product Description. Write a compelling and informative description that highlights the features, benefits, and unique selling points of your product. Use clear language and structure to make it easy for customers to understand why they should buy your product.
Setting Product Pricing
In the Pricing section, input the price of your product. You can also include the Compare at Price to show a discount if applicable. This helps create a sense of urgency and encourages customers to make a purchase. Additionally, you can set the Cost per item for internal tracking, but this won’t be visible to customers.
Setting Up Product Categories and Tags
Creating Product Categories
To organize your products effectively, Shopify allows you to group them into Collections (categories). Navigate to the Products section, and click on Collections. Here, you can create a new collection by clicking on Create Collection. You can categorize products by specific attributes like type, price range, or seasonal offerings. Collections make it easier for customers to browse and find what they’re looking for, improving the overall shopping experience.
Adding Product Tags
Product tags are a useful way to enhance searchability and filtering within your store. On the product details page, find the Tags section. You can add relevant keywords such as material, size, color, or style. Tags help customers filter products in search results and on collection pages, making it easier for them to locate specific items quickly.
Managing Inventory and Variants (Size, Color, etc.)
Managing Inventory
To manage your inventory, go to the Inventory section on the product page. Here, you can set the quantity available for each product and track stock levels. Enable the Track quantity option to monitor inventory automatically and prevent overselling. You can also set up notifications when stock runs low, ensuring you can restock in time to meet demand.
Adding Product Variants
If your product comes in different sizes, colors, or other options, you can easily add variants. On the product page, scroll to the Variants section and click Add Variant. You can input variations like size, color, or material. For each variant, you can assign unique prices, SKUs, and stock quantities. This ensures that customers can select the exact version of the product they want.
Best Practices for Product Listings
Tips on Writing SEO-Friendly Product Descriptions
Incorporate Keywords Naturally
Include relevant keywords in your product descriptions, focusing on long-tail keywords that customers are likely to search for. Use them naturally to maintain readability and avoid keyword stuffing.
Highlight Key Features and Benefits
Focus on the most important features and benefits of the product. Explain how it solves a problem or meets a need for your customers. This helps make the product more appealing and encourages purchases.
Use Engaging, Persuasive Language
Write in a way that engages your customers. Use persuasive language that creates excitement or urgency, emphasizing special features or limited availability to encourage quick action.
Structure with Headings and Bullet Points
Break up your text with headings and bullet points for better readability. This helps customers quickly find key information and makes your content more SEO-friendly by improving structure and flow.
Include High-Quality Images and Alt Text
Always use high-quality product images and add descriptive alt text. Alt text helps search engines understand the image content and boosts SEO, while also improving the accessibility of your site.
Write for Your Audience First
Focus on creating valuable, clear descriptions for your target audience. If your content meets their needs and answers their questions, it will naturally perform better in search engines and convert more visitors into buyers.
Importance of High-Quality Product Images
High-quality product images play a crucial role in e-commerce success by giving customers a clear and detailed view of what they’re purchasing. These images help build trust, as customers can closely examine the product’s appearance, features, and quality, making them more confident in their purchase decision.
In addition to boosting customer trust, high-quality images enhance user experience and increase engagement. They can significantly reduce return rates by ensuring customers receive what they expect. Moreover, well-optimized images with descriptive alt text also contribute to SEO, helping your store rank higher in search results.
Investing in sharp, professional images will improve your store’s appeal, lead to higher conversion rates, and enhance overall customer satisfaction.
9. Setting Up Payment Gateways
Introduction to Payment Gateways
Payment gateways are essential tools in e-commerce that allow businesses to securely process online payments from customers. Acting as the bridge between your online store and the financial institutions, payment gateways ensure that sensitive payment information, like credit card details, is encrypted and safely transmitted.
Their importance lies in providing a smooth, trustworthy checkout experience, which is critical for converting visitors into paying customers. Without reliable payment gateways, online transactions would be less secure, leading to potential data breaches and a loss of customer trust. By offering multiple payment options through secure gateways, businesses can boost sales, improve user experience, and build customer confidence.
How to Set Up Payments in Shopify
Setting up payments in Shopify is crucial for accepting transactions securely and efficiently. Shopify offers multiple payment gateway options, including Shopify Payments, PayPal, and third-party gateways, ensuring flexibility for both store owners and customers.
Setting Up Shopify Payments
Shopify Payments is the platform’s default payment gateway, allowing you to accept payments directly without third-party integration. To set it up, go to Settings in your Shopify admin, then click Payments. Select Shopify Payments and enter your business details, banking information, and tax details. Shopify Payments supports multiple payment methods like credit cards, Apple Pay, and Google Pay.
Setting Up PayPal
To use PayPal, go to the Payments section and enable PayPal Express Checkout. You’ll be asked to connect your PayPal business account to Shopify. Once linked, customers can pay using their PayPal balance or linked bank accounts, offering a familiar and trusted payment option.
Other Payment Gateways
For third-party gateways, navigate to Alternative payment methods in the Payments section and select from various supported providers. Enter your account details from the chosen provider to link it with Shopify.
Transaction Fees and Processing Times
Shopify charges transaction fees for each payment method, unless you’re using Shopify Payments, which eliminates these fees. The standard transaction fee for third-party gateways ranges from 0.5% to 2%. Processing times depend on the payment method—Shopify Payments typically transfers funds within 1-3 business days, while PayPal and other gateways may have varying processing times.
10. Setting Up Shipping Options
How to Configure Shipping Settings
Setting up shipping correctly in Shopify ensures your customers get accurate delivery options and rates. One key aspect is defining shipping zones, which helps you control where you ship your products and what costs are associated with each region.
Defining Shipping Zones
To define shipping zones, go to Settings in your Shopify admin and select Shipping and delivery. Under the General shipping rates section, click Manage. Here, you can create different shipping zones by grouping countries or regions where you’ll ship your products. For example, you can set up zones for domestic shipping, neighboring countries, or global destinations.
After defining a shipping zone, you can assign specific shipping rates or methods to that zone, whether flat rates, calculated rates, or free shipping. This flexibility allows you to tailor shipping costs based on the location and delivery preferences of your customers.
By properly configuring shipping zones, you ensure customers receive the right options at checkout, improving their shopping experience and boosting conversion rates.
How to Set Shipping Rates
Setting the right shipping rates in Shopify is essential for balancing costs and providing a seamless shopping experience. Shopify offers flexible shipping options, including flat rates, weight-based rates, and real-time calculated rates, allowing you to tailor shipping costs to your business needs.
Flat Rate Shipping
Flat rate shipping allows you to charge a fixed amount for shipping, regardless of the order size or weight. To set this up, go to Settings > Shipping and delivery in your Shopify admin, then click Manage rates. Choose the shipping zone where you want to apply the flat rate, and enter a fixed price. Flat rates are ideal for standardizing shipping costs and providing customers with clear expectations during checkout.
Weight-Based Shipping
Weight-based shipping calculates costs depending on the total weight of the products in the customer’s cart. You can set different rates for various weight ranges, allowing you to cover shipping costs more accurately. Navigate to the Shipping and delivery settings and click Add Rate under the specific shipping zone. Choose Weight-based conditions and specify the weight limits and associated shipping costs.
Introduction to Third-Party Shipping Services
Shopify integrates with third-party shipping carriers like USPS, UPS, and FedEx to provide real-time shipping rates. When you enable these services, customers can see up-to-date rates based on their location, package size, and weight. To enable this, go to the Shipping and delivery section, select your preferred carriers under the Carrier accounts section, and link your account.
Using third-party shipping services ensures accurate rates and gives customers the flexibility to choose the shipping speed and cost that best fits their needs. Whether you choose flat rates, weight-based rates, or third-party carriers, offering transparent shipping options improves customer satisfaction and streamlines your fulfillment process.
11. Configuring Taxes
How to Set Up Taxes in Shopify
Configuring taxes correctly in Shopify ensures compliance with local laws and keeps your pricing transparent for customers. Shopify provides both automatic tax calculation features and the option to manually adjust tax settings based on your region.
Shopify’s Automatic Tax Calculation Feature
Shopify’s built-in tax calculation feature automatically applies the correct tax rates based on your store’s location and customer’s shipping address. To enable this, navigate to Settings > Taxes and duties in your Shopify admin. Under the Tax regions section, Shopify will show the applicable tax settings for your country or region. For most locations, Shopify handles tax rates automatically, updating them when local tax laws change.
This feature simplifies tax management, ensuring your store is always in compliance without needing constant manual updates.
Manually Adjusting Taxes Based on Your Region
If you need to customize tax settings based on specific requirements, you can manually adjust them. In the Taxes and duties section, select the country or region where you want to set custom tax rates. Uncheck the Automatically calculate tax option, and you’ll be able to input custom tax rates based on local regulations.
This option is especially useful if your store operates in regions with varying tax rates or special exemptions, giving you control over how taxes are applied during checkout.
using Shopify’s tax settings, you can ensure accurate tax collection for both domestic and international sales, providing a smoother checkout experience for your customers and keeping your business compliant.
12. Launching Your Store
Final Checklist Before Launch
Before launching your Shopify store, it’s essential to ensure everything is set up correctly for a smooth shopping experience. Here’s a quick checklist to go through:
Test Your Store by Placing a Test Order
To ensure the checkout process works seamlessly, place a test order. Shopify allows you to simulate orders without actual payment, so you can verify that payment gateways, shipping options, and notifications are functioning as expected.
Ensure Your Store is Mobile-Friendly
With most online shopping happening on mobile devices, it’s crucial to verify that your store looks and works well on mobile. Shopify themes are responsive by default, but check all pages to ensure optimal performance, navigation, and readability on different devices.
Proofread Product Descriptions and Other Content
Go through your product descriptions, homepage, and other key pages for spelling, grammar, and formatting issues. Clear, error-free content adds professionalism and trustworthiness to your store.
Review Your Shipping, Payment, and Tax Settings
Double-check that your shipping rates, payment gateways, and tax settings are accurate. Any discrepancies in these settings can lead to poor customer experiences, cart abandonment, or financial loss.
Switching from Development Mode to Live
Choose a Shopify Plan
Once you’re satisfied with your store, you’ll need to pick a Shopify plan to unlock full features and remove the password protection on your site. Go to Settings > Plan, and choose the plan that best suits your business needs.
Set Up a Custom Domain
To make your store look more professional, set up a custom domain. You can buy one directly from Shopify or connect a domain you’ve purchased elsewhere. A custom domain strengthens your brand identity and makes it easier for customers to find your store.
Officially Launch Your Store
After choosing a plan and setting up your domain, your Shopify store is ready to go live. Remove the password protection by navigating to Online Store > Preferences and disabling the password. Your store is now accessible to the public!
Following this checklist ensures that your Shopify store is ready for a successful launch, providing a smooth, professional experience for your customers from day one.
Marketing Your Shopify Store
Basic Marketing Strategies
Importance of SEO for Your Shopify Store
SEO (Search Engine Optimization) is critical for driving organic traffic to your Shopify store. By optimizing product descriptions, images, and meta tags with relevant keywords, you improve your chances of appearing higher in search results. Make sure your site structure is clear, and use SEO-friendly URLs to help search engines understand your content better. The more visibility your store gets in search engines, the more potential customers you attract without paid advertising.
Social Media Marketing and Paid Ads
Social media is a powerful tool for building brand awareness and driving traffic. Platforms like Instagram, Facebook, and TikTok allow you to engage with your target audience through organic posts and stories. Paid ads on platforms like Google, Facebook, and Instagram are also effective ways to reach a broader audience. These ads can be highly targeted based on user demographics, interests, and online behavior, making them a smart investment for growing your store’s visibility.
Shopify Apps to Help With Marketing
Shopify’s app store offers a wide range of tools that make marketing more effective. For email marketing, apps like Klaviyo and Omnisend allow you to create automated campaigns for new arrivals, abandoned carts, or special offers. You can also use apps like Discount Codes to create sales and promotions that encourage customer loyalty. These tools simplify your marketing efforts and help boost sales while saving time.
Shopify Analytics and Reports
Using Shopify’s Analytics Dashboard
Shopify’s built-in analytics dashboard is a valuable tool for tracking sales, traffic, and customer behavior. The dashboard shows metrics such as total sales, conversion rates, and average order value. You can also view where your traffic comes from, whether it’s organic search, social media, or paid ads.
With Shopify’s customer behavior insights, you can identify which products are performing well and which pages customers are visiting most. By analyzing this data, you can make informed decisions about marketing strategies, product offerings, and customer engagement, leading to better business performance.
Conclusion
Recap of Key Steps
In this tutorial, we covered all the essential steps for launching your Shopify store—from creating an account and customizing your theme, to setting up payment gateways, configuring shipping and taxes, and implementing basic marketing strategies. You’ve also learned how to optimize your store for SEO, manage products, and use Shopify’s analytics to track performance.
Encouragement to Start Now
Now that you have a solid understanding of how to set up your Shopify store, it’s time to take action. Shopify’s user-friendly platform makes it easy for beginners to start selling online, and with the right strategies in place, you’re set for success. Don’t wait—get started today and turn your e-commerce dreams into reality!
Additional Tips for Beginners
Best Shopify Apps for Beginners
To make your Shopify store run smoothly and boost its functionality, here are some essential apps every beginner should consider:
- Oberlo: Ideal for dropshipping, Oberlo allows you to import products directly into your store from suppliers and ship them without handling inventory.
- GetResponse: A powerful email marketing tool, GetResponse helps you create automated campaigns, manage email lists, and track results, making it perfect for engaging customers.
- Semrush: This all-in-one SEO tool can help optimize your store for search engines by providing keyword suggestions, site audits, and competitive analysis to improve your visibility and rankings.
- Shopify Email: Shopify’s native email marketing app allows you to send branded emails directly from your store, helping with customer retention and sales.
FAQs
Is Shopify beginner friendly?
Yes, Shopify is very beginner-friendly. It offers an intuitive interface, drag-and-drop design capabilities, and extensive resources to help new users set up their stores easily. With numerous templates and straightforward setup processes, beginners can navigate the platform without extensive technical knowledge.
How to sell on Shopify for beginners?
To sell on Shopify as a beginner:
- Sign Up: Create an account on Shopify.
- Choose a Theme: Select a professional template for your store.
- Add Products: Upload product images, descriptions, and prices.
- Set Up Payment Options: Configure payment gateways for transactions.
- Launch Your Store: Go live and promote your store through social media and marketing strategies.
How to set up a Shopify store for dropshipping?
To set up a Shopify store for dropshipping:
- Sign Up for Shopify: Create an account.
- Choose a Dropshipping App: Install apps like Oberlo or Spocket to find products.
- Import Products: Use the app to add products to your store.
- Set Pricing and Shipping: Configure your pricing strategy and shipping settings.
- Launch and Market: Go live and promote your store through various channels
How to create an e-commerce website in Shopify?
To create an e-commerce website in Shopify:
- Create an Account: Sign up for a Shopify plan.
- Select a Theme: Choose a visually appealing theme.
- Customize Your Store: Use the Shopify editor to add your brand elements.
- Add Products: Include product details, images, and prices.
- Set Up Payment and Shipping: Configure payment methods and shipping options.
- Launch Your Store: Make your store live and start selling.
How to create a Shopify store step by step?
- Sign Up for Shopify: Start your free trial or select a plan.
- Choose a Domain Name: Pick a unique domain for your store.
- Select a Theme: Browse and choose a theme that fits your brand.
- Add Products: Upload product details and images.
- Set Up Payment Methods: Choose how you’ll accept payments.
- Configure Shipping: Set shipping rates and regions.
- Launch Your Store: Go live and promote your business
Can I make a Shopify website myself?
Yes, you can make a Shopify website yourself. The platform is designed for users of all skill levels, providing easy-to-use tools and templates that allow you to create a professional online store without needing coding experience.
How to create a Shopify website 2024 e-commerce website tutorial free?
To create a Shopify website in 2024 for free:
- Sign Up for a Free Trial: Start with Shopify’s free trial.
- Follow Online Tutorials: Use resources like Shopify’s Help Center and YouTube for step-by-step guides.
- Join Communities: Engage with online forums and groups for tips and advice.
- Explore Free Themes: Select from free themes in the Shopify Theme Store.
How to build a Shopify website from scratch?
- Create an Account: Sign up for Shopify.
- Choose a Domain: Pick a domain that represents your brand.
- Select a Theme: Start with a blank theme or a free template.
- Customize Your Store: Use the editor to add your branding and style.
- Add Products: Upload product information and images.
- Configure Payment and Shipping: Set up how you'll accept payments and ship products.
- Launch: Go live and promote your store.
How do I sell on Shopify for beginners?
To sell on Shopify as a beginner, sign up for an account, choose a theme, add products, set payment methods, and launch your store. Utilize Shopify’s resources and community support to guide you along the way.
What is the easiest thing to sell on Shopify?
The easiest things to sell on Shopify include print-on-demand items, digital products (like e-books or courses), and dropshipping products, as they require less upfront investment and inventory management.
How to start a Shopify store for beginners?
- Sign Up for Shopify: Create an account.
- Choose a Theme: Select a suitable template.
- Add Products: Upload product details and images.
- Set Up Payments and Shipping: Configure payment gateways and shipping options.
- Launch Your Store: Go live and start promoting.
How to sell on Shopify in 2024 for beginners online?
To sell on Shopify in 2024 as a beginner, follow the steps to set up your store, optimize your listings for SEO, and promote your products through social media and online marketing strategies.
How to set up a Shopify store for dropshipping?
- Create a Shopify Account: Sign up for a Free plan.
- Choose a Dropshipping App: Install an app like Oberlo.
- Find Products: Use the app to select products to sell.
- Customize Your Store: Make your store visually appealing.
- Launch Your Store: Start selling and promote your business.
Selling products online from home for beginners?
To sell products online from home as a beginner, choose a niche, set up a Shopify store, and list your products. Use social media and online marketing to reach customers and drive sales.